팀 프로젝트를 하기 전에 웹 애플리케이션에 대한 기본적인 구상이 필요하다고 생각되서
1 | |
미니 프로젝트를 하면서 해볼 내용들
대충 구조를 구상했으니 뭘 사용할지 고민을 했다.
인터넷이 급격히 발달하고 ChatGPT도 나온 상황에서 정보는 굉장히 귀중한 자산이 되었다.
이런 정보들을 보호하기 위한 보안도 중요하지 않을까? > 보안 (Spring Security 6:3.1.2)
물론 디자인은 중요하지만 생각보다 귀찮다. > 대신 애니메이션 효과를 추가 (Swiper, gif…)
내가 리펙토링이나 코드 자체를 최적화하는데는 익숙치 않으니 > 이미지 변환(Sejda, DB조회 최소화)
그리고 데이터들의 영속성을 위해 편의성을 주는 프레임워크들(Persistence Framework)
SQL Mapper와 ORM인데 JAVA에서 대표적인 것들이 각각 Mybatis와 JPA
SQL Mapper
Object와 SQL의 필드를 매핑하여 데이터를 객체화 하는 기술
- 객체와 테이블 간의 관계를 매핑하는 것이 아님
- SQL문을 직접 작성하고 쿼리 수행 결과를 어떠한 객체에 매핑할지 바인딩 하는 방법
- DBMS에 종속적인 문제
- EX) JdbcTemplate, MyBatis
ORM (Object Relational Mapping)
Object와 DB테이블을 매핑하여 데이터를 객체화하는 기술
- 개발자가 반복적인 SQL을 직접 작성하지 않음
- DBMS에 종속적이지 않음
- 복잡한 쿼리의 경우 JPQL을 사용하거나 SQL Mapper을 혼용하여 사용 가능
JPA(ORM) : 자바 ORM의 기술 표준 대표적인 오픈소스로 Hibernate CRUD 메소드 기본 제공 쿼리를 만들지 않아도 됨 1차 캐싱, 쓰기지연, 변경감지, 지연로딩 제공 MyBatis는 쿼리가 수정되어 데이터 정보가 바뀌면 그에 사용 되고 있던 DTO와 함께 수정해주어야 하는 반면에, JPA 는 객체만 바꾸면 된다. 즉, 객체 중심으로 개발 가능 but 복잡한 쿼리는 해결이 어려움
MyBatis(SQL Mapper) 자바에서 SQL Mapper를 지원해주는 프레임워크 SQL문을 이용해서 RDB에 접근, 데이터를 객체화 시켜줌 SQL을 직접 작성하여 쿼리 수행 결과를 객체와 매핑 쿼리문을 xml로 분리 가능 복잡한 쿼리문 작성 가능 데이터 캐싱 기능으로 성능 향상 but 객체와 쿼리문 모두 관리해야함, CRUD 메소드를 직접 다 구현해야함.
이런 식인데 JPA의 경우는 복잡한 쿼리를 하려면 JOOQ나 QueryDSL을 병행해야한다. 하지만 만약 협업을 하고자 할 때는 이것들 전부 알고 가는 것은 힘들다고 생각해서 협업할 때는 Mybatis를 해야할 것 같다.
물론 지금은 빠른 개발을 위해 JPA를 사용할 예정이다.
어쨌든 이것이 내 프로젝트에 설치한 내용들이다.
build.gradle
1 | |
가장 중요하다고 판단한 내용은 우선 기본 틀이다.

사실 JWT 토큰을 적용할까 생각도 했었지만 이 부분은 다른 곳에서 다룰 예정이다.
우선 해당 프로젝트에는 스프링 시큐리티라는 스프링 하위 프레임워크이다.
인증(Authentication) 인증은 사용자의 신원을 입증하는 과정이다. 쉽게 말하면 우리가 흔히 어떤 사이트에 아이디와 비밀번호를 입력하고 로그인하는 과정이다.
인가(Authorization) 인가는 사용자의 권한을 확인하는 작업이다. 이것도 쉽게 말하면 파일 공유 시스템에서 권한 별로 접근할 수 있는 폴더가 상이하다. 상위직책자는 들어갈 수 있고, 하위 직책자는 접근할 수 없는 경우 사용자의 권한을 확인해야 하는데 이 과정을 인가라고 한다.
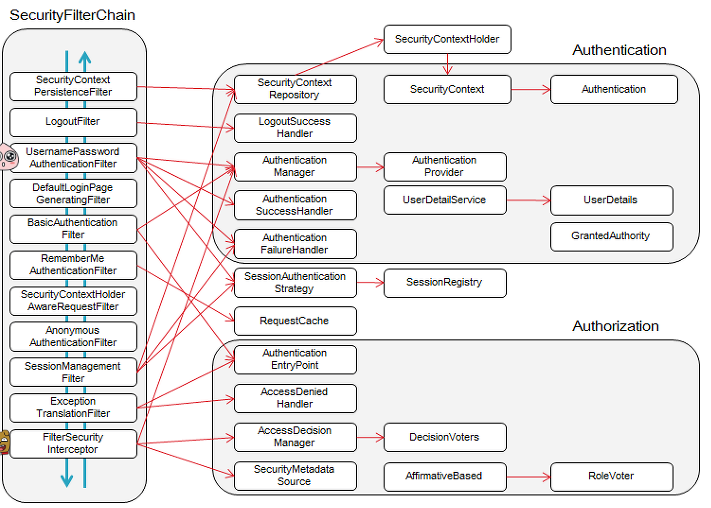
스프링 시큐리티 인증 처리 과정
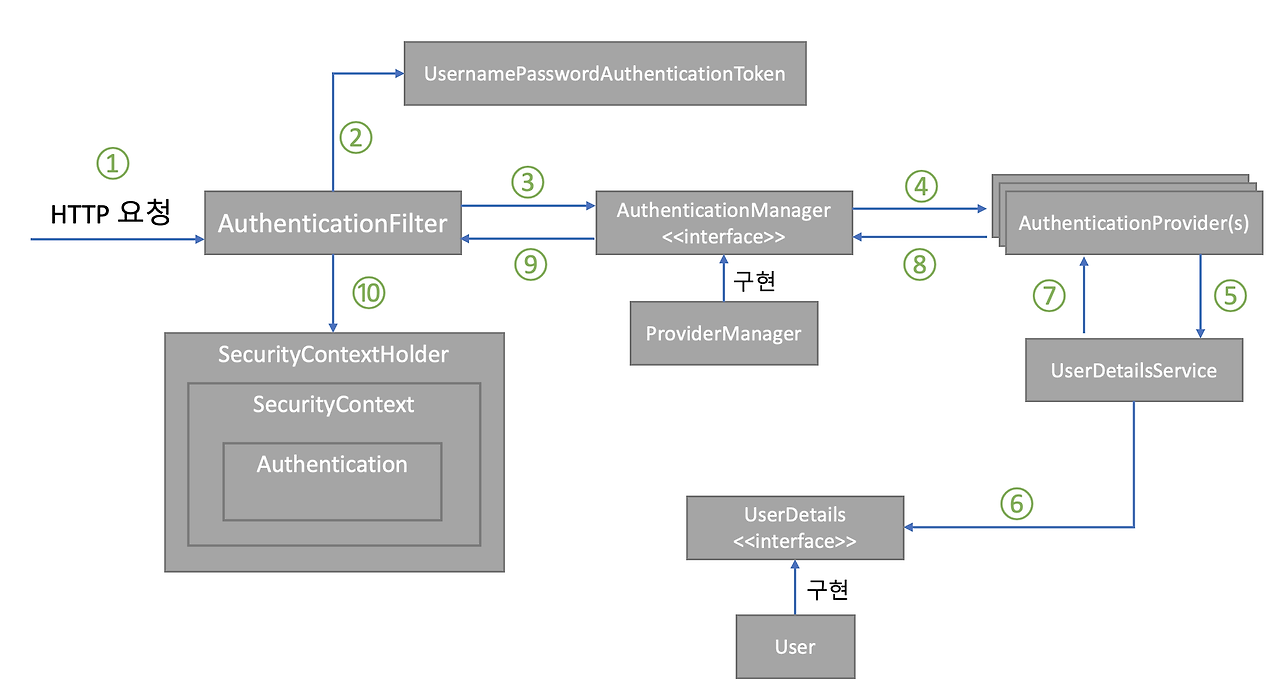
- 사용자가 폼에 아이디, 패스워드를 입력하면 HTTPServletRequest에 아이디, 비밀번호 정보가 전달된다. 이때 AuthenticationFilter가 넘어온 아이디와 비밀번호의 유효성 검사를 실시한다.
- 유효성 검사 후 실제 구현체인 UsernamePasswordAuthenticationToken을 만들어 넘겨준다.
- 인증용 객체인 UsernamePasswordAuthenticationToken을 AuthenticationManager에게 전달한다.
- UsernamePasswordAuthenticationToken을 AuthenticationProvider에게 전달한다.
- 사용자 아이디를 UserDetailsService로 보낸다. UserDetailService는 사용자 아이디로 찾은 사용자의 정보를 UserDetails 객체로 만들어 AuthenticationProvider에게 전달한다.
- DB에 있는 사용자 정보를 가져온다.
- 입력 정보와 UserDetails의 정보를 비교해 실제 인증 처리를 진행한다.
- ~ 10까지 인증이 완료되면 SecurityContextHolder에 Authentication을 저장한다. 인증 성공 여부에 따라 성공 시 AuthenticationSuccessHandler, 실패 시 AuthenticationFailureHandler 핸들러를 실행한다.
UserVo.java
1 | |
Mybatis랑 JPA랑 병행하고 싶어서 나눠놓았다.
PrincipalDetails.java
UserDetails 클래스는 스프링 시큐리티에서 사용자의 인증 정보를 담아 두는 인터페이스이므로 필수 오버라이드 메서드가 많다.
1 | |
Repository 생성
스프링 시큐리티를 이용해 사용자 정보를 가져오기 위해서는 스프링 시큐리티가 이메일을 전달받아야 한다.
UserRepo.java
1 | |
Service 생성
UserDetailsService 인터페이스를 구현하고, loadUserByUsername() 메서드를 오버라이딩해서 사용자 정보를 가져오는 로직을 작성한다.
PrincipalDetailsService.java
1 | |
SecurityConfig.java
1 | |
configure() : 스프링 시큐리티의 모든 기능(인증, 인가)을 사용하지 않게 설정. requestMatchers() : 특정 요청과 일치하는 url에 대한 액세스 설정 ignoring() : requestMatchres()에 적힌 url에 대해 인증, 인가 서비스를 적용 X filterChain() : 특정 HTTP 요청에 대해 웹 기반 보안 구성. 인증/인가 및 로그인, 로그아웃 설정 permitAll() : 누구나 접근 가능. requestMatchers()에 기재된 url은 인증, 인가 없이도 접근 가능 anyRequest() : 해당 코드 윗 줄에서 설정한 url 이외의 요청에 대해 설정 authenticated() : 인가는 필요하지 않지만 인증이 필요 loginPage() : 로그인 페이지 설정 defaultSuccessUrl() : 로그인 성공 시 이동할 경로 logoutSuccessUrl() : 로그아웃 성공 시 이동할 경로 invalidateHttpSession() : 로그아웃 이후에 세션 전체 삭제 여부 csrf().disable() : CSRF 설정 비활성화. 원래는 CSRF 공격을 방지하기 위해 활성화하는 게 좋다 daoAuthenticationProvider() : 인증 관리자 설정. 사용자 정보를 가져올 서비스를 재정의하거나, 인증 방법 등을 설정 setUserDetailsService() : 사용자 정보를 가져올 서비스를 설정. 이때 설정하는 서비스 클래스는 반드시 UserDetailsService를 상속받은 클래스여야 한다. setPasswordEncoder() : 비밀번호 암호화를 위한 인코더 설정 bCryptPasswordEncoder() : 비밀번호 암호화를 위한 빈 등록
signupDto.java
1 | |
AuthService.java
패스워드를 BCryptPasswordEncoder를 사용해서 암호화한 후에 저장한다.
1 | |
AuthController.java
1 | |
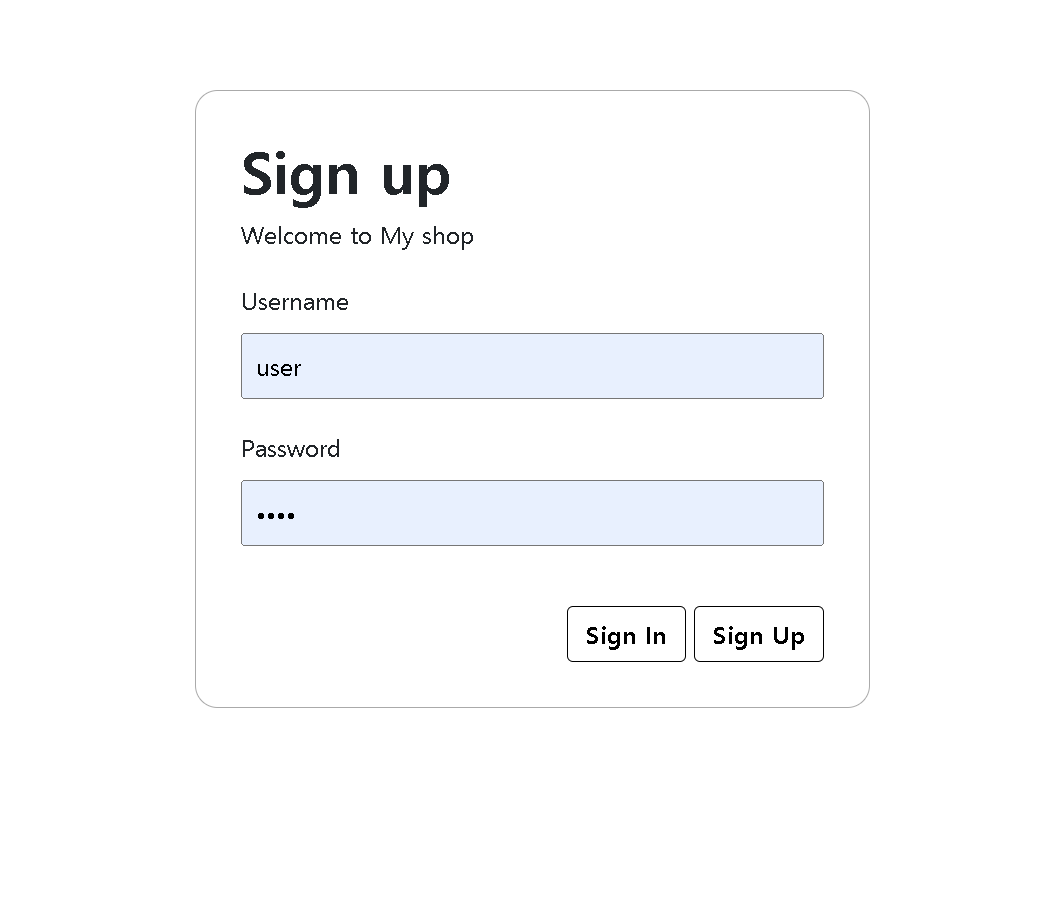
회원가입 화면
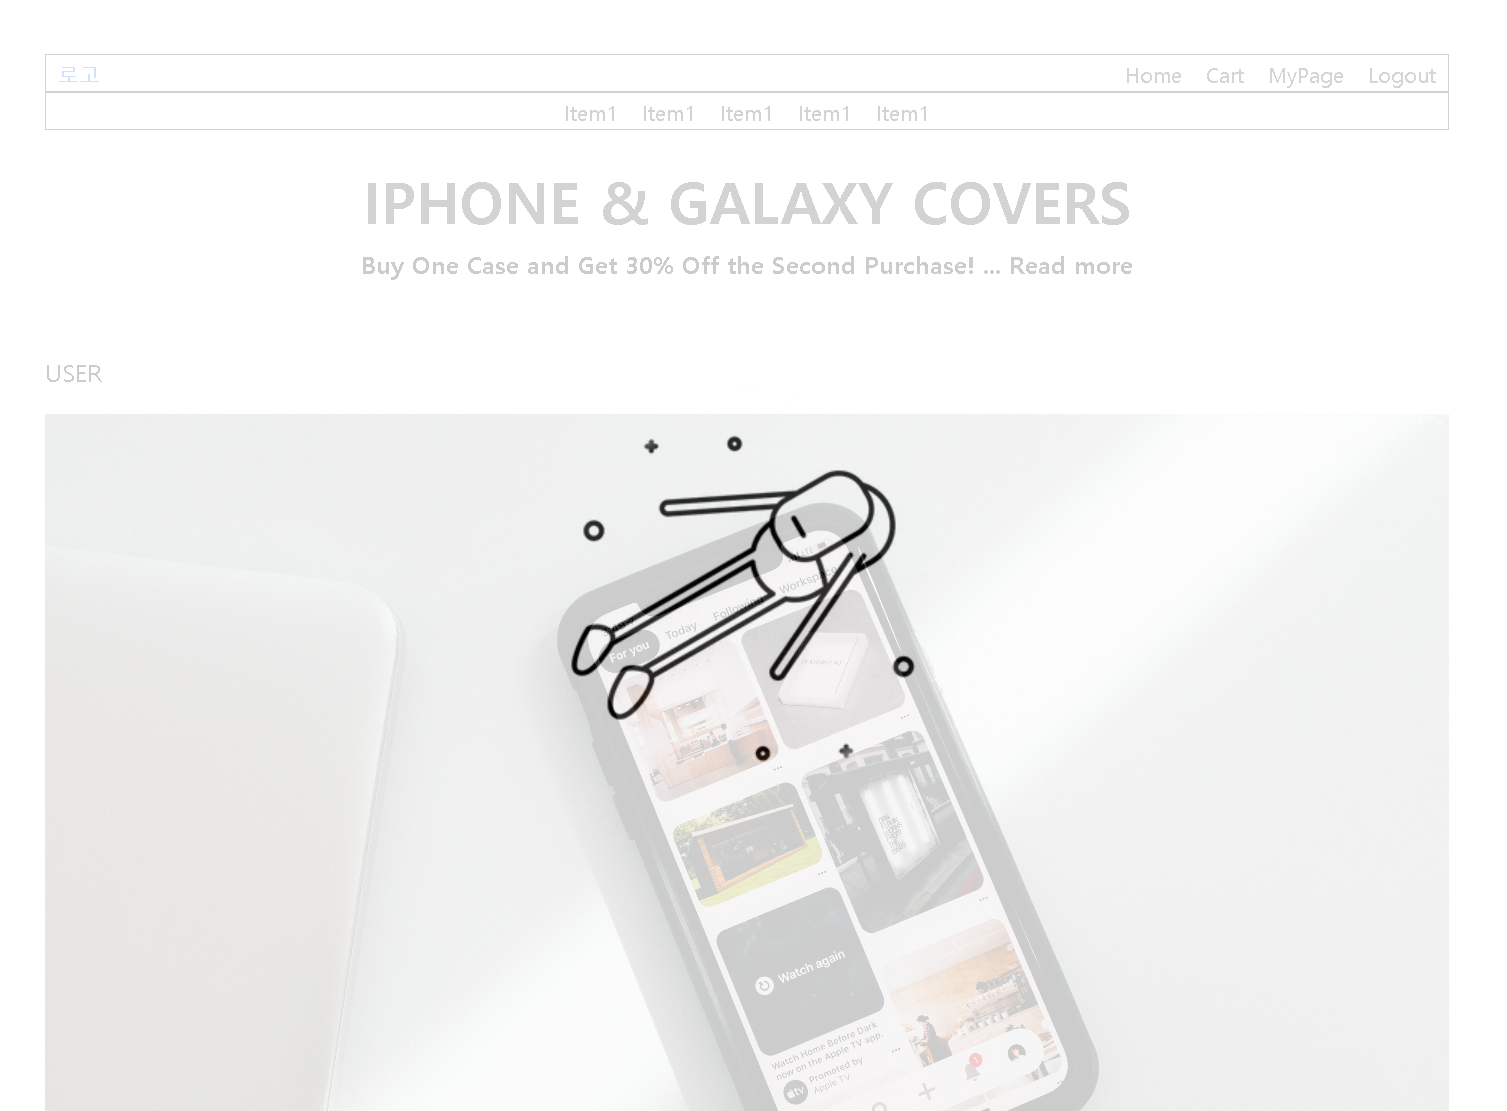
성공시 화면
성공시 header 부분이 변경된 걸 볼 수 있는데 Main페이지에는 loading 시 심심하지 않도록 gif를 넣어놓았다.
그냥 JavaScript로 구현한 것이다. 아래에 코드를 첨부한다. (Jquery를 사용했다. 최근에는 그냥 JavaScript로도 작성할 수 있다고 하니 다음에는 Jquery를 사용하지 않고 해보도록 하겠다.)
HomePage.html
1 | |
layout.js
1 | |
Main화면을 보면 상품들이 있는 것을 알 수 있는데 Controller 내용은 이렇고
1 | |
Item의 테이블도 이러하다.
1 | |
ItemService.java
1 | |
ItemServiceImpl.java
1 | |
사실 기능이 있는 추가코드가 많은데 아직 넣지 않은 이유는 JPA와 JOOQ는 멀티 모듈을 사용해야하고
그냥 Query 어노테이션을 사용하자니 어플레케이션 구동 시점에서 결과를 확인할 수 있어서 불편하고
JPA Criteria Query는 사용방법이 복잡하여 실행하고자 하는 JPQL을 직관적으로 알기 어렵습니다
그래서 QueryDSL이나 Mybatis를 병행해서 시도해볼 예정입니다.
보여지는 홈페이지에는 ThymeLeaf를 사용해서 구현되어 있습니다.
또한 옛날 thymeLeaf와 import하는 방식이 달라서 최신 문서를 보고 시도하셔야 합니다.
Main.html
1 | |
HomePage.html
1 | |
추후에 내용들을 더 업데이트 하도록 하겠습니다.
해당 내용들의 코드는 제 깃허브 링크를 타고 가시면 쉽게 찾아볼 수 있습니다.